Have you signed up to win our 1000 follower give-away yet at this post right here? We are ALMOST there before we draw the $25.00 gift certificate! Tell your friends to check us out and help us reach our goal!
Okay...so here's how you can enter to win this gift certificate. First, make sure you are a follower of Papercraft Star (of course!), and leave a comment here on this post (or at the first post that we wrote about this give-away right here) between now and Midnight (Eastern Time) on January 30, 2011 or when we reach 1000 followers, whichever is LATER.
Next, get your name entered a second time if you post about this give-away on your blog (please leave us your blog address so we can check it out!), Tweet or Facebook about it if you don't have a blog!
And... get your name entered a third time if you put this button on your blog sidebar with a link to THIS POST!
Three awesome ways to win your choice of a $25.00 Gift Certificate to either Papertrey Ink or My Favorite Things!
Now go forth and craft (oh, and tell everyone about Papercraft Star too!)
January 16, 2011
January 15, 2011
January 13, 2011
Papercraft Star Executive Team Reveal

I thought it would be fun to combine my project this week with products from Imaginisce. I just recently received a huge box of products to use due to my new position on the 2011 Imaginisce Design Team and I wanted to provide my followers at my blog and those here at Papercraft Star as well an opportunity to see the ever-so-cute Enchanted Collection by Imaginisce.
This card is for my darling niece Mia, just to remind her of how much she is loved by me... and to say that she's beautiful inside and out!
Other products from Imaginisce that I used to create this card include the I-Top, to make that cute matching button on the ribbon flower and the I-Rock tool to add all the sparkling gems. I also heated up my new I-bond cordless glue gun to create the ribbon flower. It is SO FANTASTIC to have a glue gun that doesn't require you to be near an outlet!
The die cuts from the Enchanted collection made this card a snap to put together. I also used my Cricut and the Gypsy Wanderings cart to create the flourishes I added to the ribbon flower and cardstock from Papertrey Ink.
There is still time to enter this week's challenge at Papercraft Star and we can't wait to see what you create with Liz's sketch! If you are looking for the link, it is in the upper left corner of our sidebar! Also, don't forget to begin voting for your favorite projects at 12 noon (Eastern Time) tomorrow (Saturday!).
Thursday's Tutorial from Kim !!
Today Kim Duran has created another one of her favorite flower tutorials just for you. This is just about the easiest flower you can make, uses no glue, and can be done in minutes!
Supplies:
Supplies:
- Scalloped punch or circle punch (any size)
- Tissue paper of any color or pages from a book (Kim used both types for her tutorial)
- Small brad or staple
- (Optional) Glimmer Mist
Step 1. Punch out approximately 10 layers of tissue paper. To save time, you can fold the tissue paper first into several layers and punch once. Insert a brad in the center to keep all the layers together. (You can also use a staple because this piece won't be visible after the flower is complete.)
Step 2. Using your fingers, crinkle one layer at a time up towards the center. This is the fun part because it does not have to be perfect. The messier, the better!
Keep at it until all the layers are crinkled into a small cluster, like so...
Step 3. Using your fingers, carefully peel open the layers until the flower blossom is open to the size you want.
Step 4. (Optional) Spray your flower blossom with Glimmer Mist for some sparkle and color. Kim loves how the Glimmer Mist adds a gradient to the petals!
The end result will give you big beautiful blossoms with lots of layers. Perfect for embellishments on your cards, layouts, or crafty projects!
Just add a spot of glue or foam tape, adhere to your project, and viola! You're pretty flower just saved you a pretty penny because you created it yourself for a fraction of the cost!
January 12, 2011
Challenge 28 at Papercraft Star Opens Today
Welcome to another challenge week here at Papercraft Star ! All month our design team is using Pink Cat Studio digi images - we think you are going to love what you see.
Regan is loving the cute digi stamps from PinkCatStudio! She created this cute little birthday card using the fabulous sketch this week! The sentiment on the inside is half stamped and half hand written. It reads "That Means 'Happy Birthday' in Dinosaur!" For more photos and details, please visit her blog.
Using this week's sketch Liz made an elegant wedding card. In place of the bow she used a butterfly. She also used some embossed paper and pearls to add to the elegance.
Tracy has created a very girly card this week using the "Lily with Hot Cocoa" digital stamp from Pink Cat Studio. She colored her image with Copic markers and added a lacy punched edge and pretty pink flourish.
Kimberly followed the sketch to create a Get Well card using the "Bunny Holding Flower" digi stamp from Pink Cat Studio. Kim colored her image using Photoshop to match the bunny with her purple pattered papers and beige cardstock. To create the scalloped border, Kim used a one inch circle punch and stamped each piece, then tied a ribbon around to hide the top edge. For all products used and more photos, visit Kim's blog.
Link up your submissions below - we loved this sketch and we want to see your version! Remember that participating in our challenges makes you eligible to win our sponsor prizes. Come back tomorrow for our Thursday Tutorial!
OUR SPONSOR FOR JANUARY
Pink Cat Studio is our Grand Prize sponsor for this month and you'll see a number of their darling stamps used on our Designer Team projects all month long as well! Pink Cat Studio is all about offering fun and whimsical stamps to inspire your creativity. They have a huge selection of super cute digi and rubber stamps to choose from and they add more each week. Owner and artist Melissa started PCS in 2005 and over the years nothing has excited and inspired her more than to see your creations with her stamps. Melissa’s goal is to continue to delight and surprise you with her designs. Stop by the studio today and get in on the fun!
OUR SPONSOR THIS WEEK
Our winner this week will receive a digi stamp. Michelle's Scrapbooking & More is the home of The Pixie Cottage stamps, with many different illustrators/artists contributing their art work we have a stamp for every taste. We are now selling not only single stamps, but some stamp sets as well. Red rubber and digital images are both available, so stop by and take a look at our latest images. If stamps are not your thing, we have a wide selection of papercrafting supplies too !
THIS WEEK'S CHALLENGE
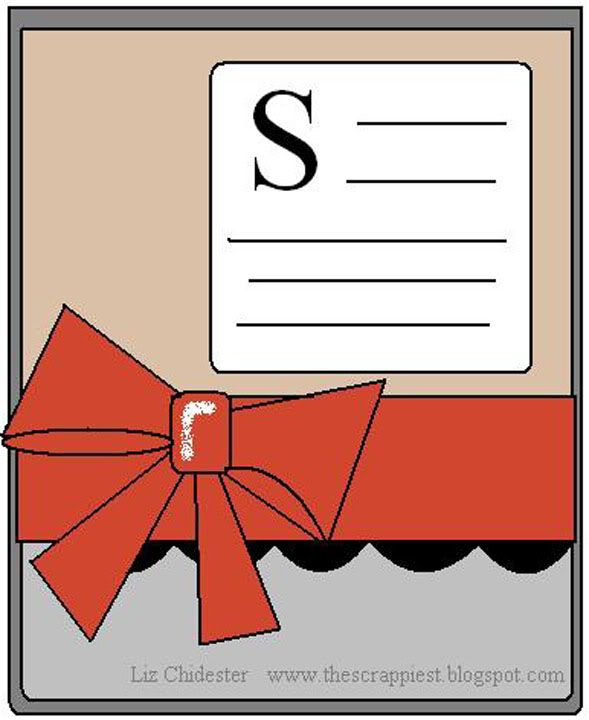
Our challenge this week is a Liz Chidester Sketch.
Create a project of your choice using this sketch as your inspiration.
Design Team Reveal
| Jan |
Jan says she had no idea this sketch would lead to this card. Isn't that the dearest little birdie digi image, from Pink Cat Studio ! Her secret new "addiction" is that brand new sewing machine Santa brought her - she says she is still practicing ...
| Regan |
| Liz |
![]() |
| Tracy |
![]() |
| Angi |
Angi loved working with Liz's sketch this week. It gave her a chance to work with these yummy paper die-cuts from The Girls' Paperie. Angi wanted to keep a clean and simple look to her card. She layered several die-cuts to add more dimension and added some fancy designer ribbon. To see more of this card please hop on over to Angi's blog.
![]() |
| Kimberly |
![]() |
| C |
C created a get well card using this week's challenge sketch and the Sick Billy digital stamp from Pink Cat Studio. C shows off the fun colors in the stamp by using Max & Whiskers papers from Basic Grey...a fun choice considering little Billy is holding his dog in his lap. Check out her blog for more details!
![]() |
| Jennifer |
Jennifer created this cute birthday card using a digi stamp from Pink Cat Studio and this week's sketch! The image was colored with Copics, cut out, and adhered to the card using foam squares to give it dimension. Check out her blog for more!
Link up your submissions below - we loved this sketch and we want to see your version! Remember that participating in our challenges makes you eligible to win our sponsor prizes. Come back tomorrow for our Thursday Tutorial!
Subscribe to:
Posts (Atom)